|
Home > Hello world Rpx. First example. [Ver en Español]
|
"Hello World". First example of an Rpx report |
Rpx is the most important format for Rpv Reports. It is very simple to learn specially because Rpv Visual Editor will make possible to prepare the templates visually, without typing code. The Visual Editor is the best option to use with Rpx files.
What is an RPX?
In few words, the RPX format is the data that will be shown on the report.
It contains only the data that you want to show in your report and it is combined with the "RPV template" that you will create using the Rpv Visual Editor.
The RPX file should be created by your program.
Structure of an RPX file.
The structure of an Rpx file is very simple. The first line is used to set the template to which the Rpx will send the data.
The rest of the lines contain data delimited by a char. The format of that data will be defined by the programmer.
Here we have a very simple example with 4 records.
File: test1.rpx
|
TEMPLATE=musicians.rpv
|DETAIL|John Lennon|Guitar|UK|
|DETAIL|Paul Mc Cartney|Bass|UK|
|DETAIL|George Harrison|Guitar|UK|
|DETAIL|Ringo Star|Drums|UK|
|
The first line that we see indicates the "RPV template" this file will send the data to.
After that, we have four simple records.
We can guess also what those fields mean:
DETAIL: The identifier of the line. Is a name invented by the programmer. 'Detail' appears to be a good name, but any other is ok. The rest of the fields indicate name, instrument, and country of birth as you can imagine.
In COBOL it could be said like the following:
|
01 DETAIL-LINE.
03 FILLER PIC X VALUE '|'.
03 FILLER PIC X(6) VALUE 'DETAIL'.
03 FILLER PIC X VALUE '|'.
03 DET-NAME PIC X(30) VALUE SPACES.
03 FILLER PIC X VALUE '|'.
03 DET-INSTRUMENT PIC X(15) VALUE SPACES.
03 FILLER PIC X VALUE '|'.
03 DET-COUNTRY PIC X(2) VALUE SPACES.
|
Yes. "|DETAIL|" could be in the same line.
Preparing the template from this file
Now we will see the RPV template to insert this data into. We will prepare it with the Visual Editor:
1) First of all we must generate the RPX. To do so, open a notepad (or any other editor) and paste this code. Save it to your hard disk with the name c:\temp\test1.rpx.
You can also download the entire example clicking here
2) After that, open the Rpv Visual Editor and create a new report.
Specify the file test1.rpx. To do so just type it or browse.
After the verification of the RPX just click on the "Create template from this file" button.
|
 |
You will obtain the following:
|
 |
|
Here we can see the three basic sections: HEADER, DATA and FOOTER. Additionally, a subsection has been created using the data that is on the RPX file.
You can, optionally, rename the fields according your needs. The Visual Editor creates the fields as @field01, @field02 and so on.
|
To rename the fields just double click on the subsection and this window will display. Once the fields have a correct name, click on ok to exit the window.
|

|
|
The properties of the subsection will appear and it will be possible (but not required) to change the names of the fields.
The fields will be named as @field01, @field02, @field03 by default.
To change the names just click on the column and type the new name of the field. With or without the "@" at the beginning, the visual editor will fix that.
Important: take into account how to name the fields/columns. If you have one field named "@address", you may not name another one as "@address2". The reason is because when you say
@address2 you will be also saying @address. The name "@address" is contained in "@address2".
To solve this problem, just name @address01, @address02 for example.
|
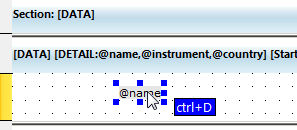
In this case we will name @field01, @field02 and @field03 as @name, @instrument, @country.
When the fields are renamed they will be inserted into the DETAIL subsection.
With the mouse within DETAIL subsection just hit CTRL+D to insert the field into the subsection.
|
|
|

|
Just move each the fields in the proper place and adjust the height of the subsection. It will look like this:
|
|
Now, you can see this report for the first time. To do that just hit F5 or select "See Report" from the menu.
|

|
Now there are some things that we should add to this new report to make it better.
Adding titles
The titles will be contained in the HEADER section.
The HEADER section contains the information that will be repeated on every page.
We will add a box, an image and the name of the columns and the number of page.
|

This is the report on the Rpv Visual Editor prior to be displayed on the Viewer.
Note: "Page @@page of @@ofpag". That is one entire label. When there is a variable or a function into a label, it is changed by the proper value at runtime.
It is not needed that one variable is in one label. The same label may contain as many variables or functions as needed.
|
|

This is how the Rpv Viewer will show the report. This is how the end user will see it.
|
Saving the template
Now we must save the template. Any name that we want to use is ok. However, the template must be referenced from the RPX at the first line.
Even when the example of the RPX file is not showing the entire path, it could be interesting to reference the complete path to avoid inconveniences.
The template is saved with extension RPV.
More records....
Ok! The Beatles were only four. What if we want to show more records?
If there are more records, the RPV viewer will format the data and will insert new pages when needed.
Download this the file to see the example properly.
|
|
|
|
Copyright (c) 2001-2024 - Rpv Software. All rights reserved.
|

 "The RPV Viewer")
 "The RPV Viewer")
 "The RPV Viewer")
 "Rpx format")
 "Rpx format")
 "Rpx format")
 "Rpx format")